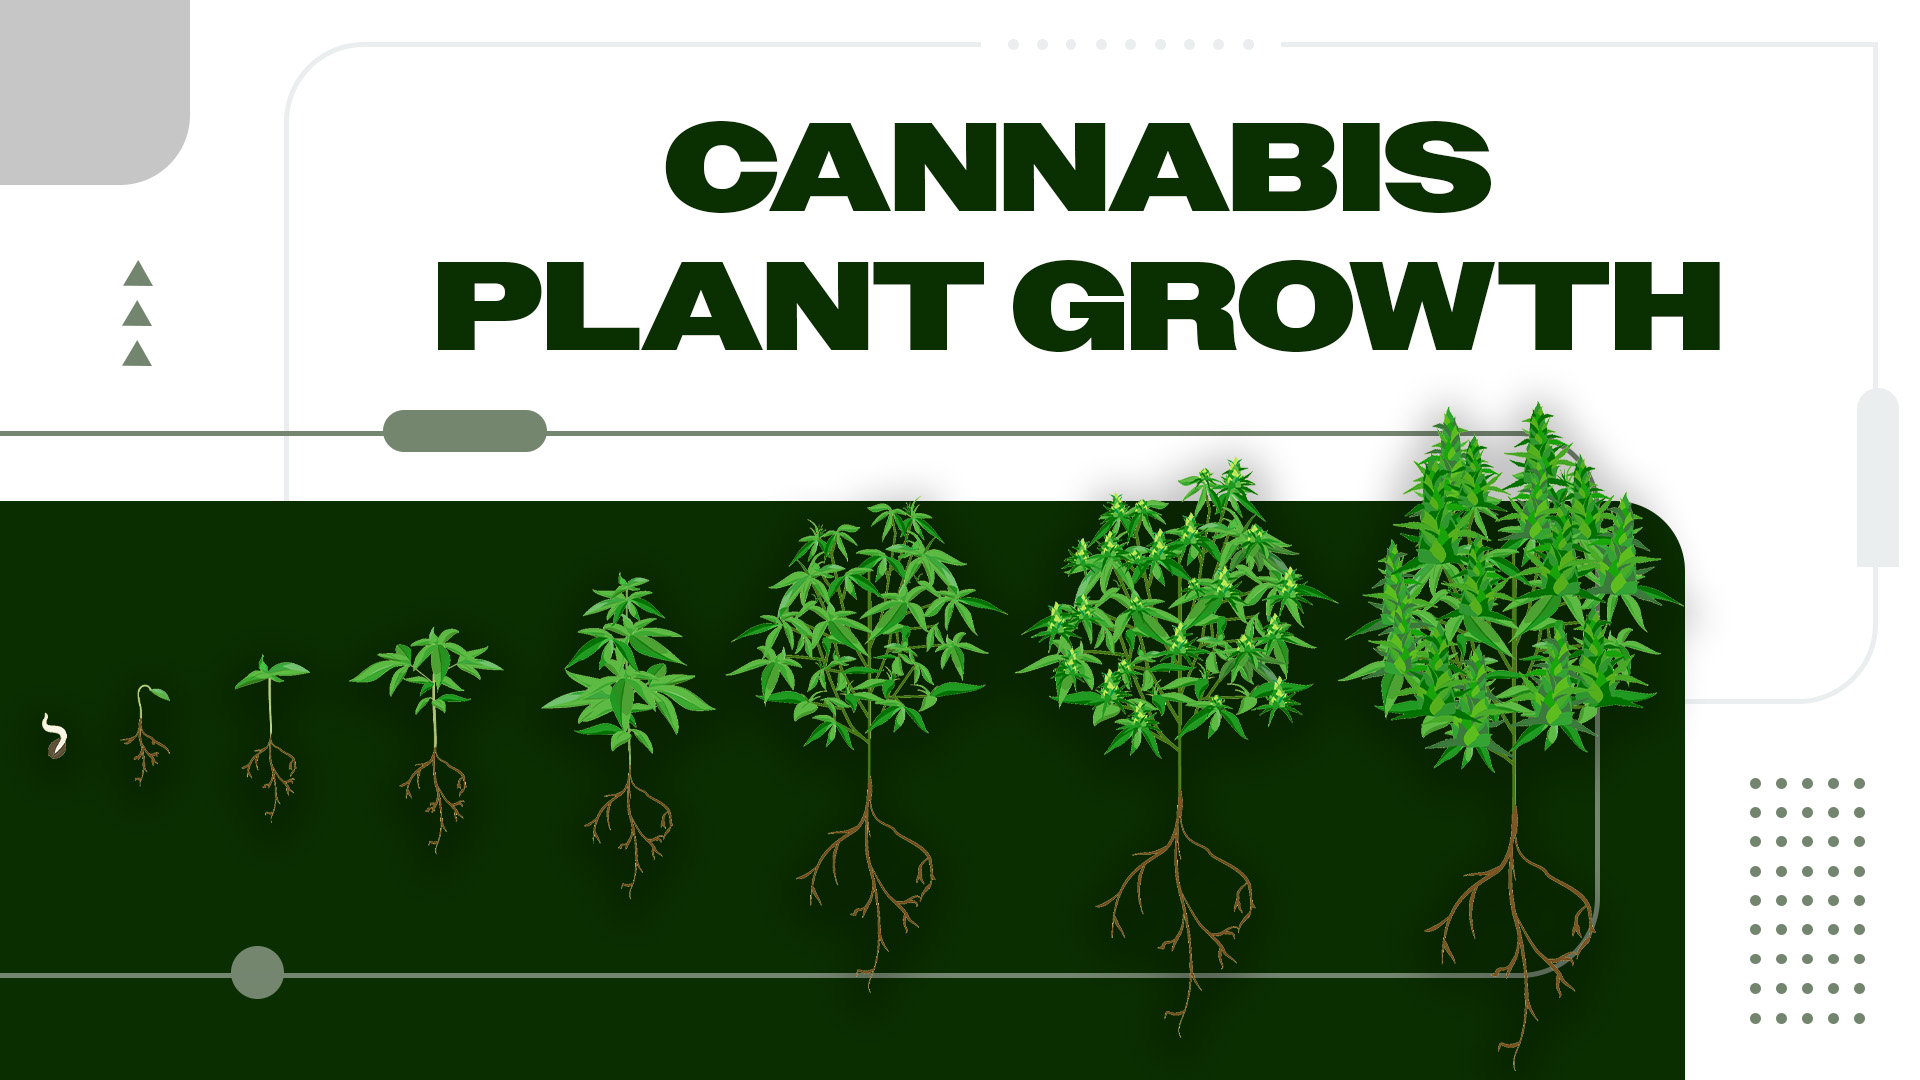
Growing cannabis from seed to harvest involves six distinct stages, each requiring specific care and environmental conditions. Understanding these stages helps you anticipate your plant’s needs and troubleshoot problems before they damage your crop. This guide covers the complete cannabis growth cycle with timelines, visual indicators, and practical tips for each phase.
Cannabis Plant Growth Timeline Overview
The complete cannabis life cycle spans 3-8 months from seed to harvest, depending on your growing method and strain choice. Indoor growers typically see faster development due to controlled conditions, while outdoor plants follow natural seasonal patterns that extend the timeline.
Total Timeline Breakdown:
| Stage |
Duration |
Key Visual Indicators |
Primary Activities |
| Germination |
3-10 days |
Taproot emergence, seed shell cracking |
Moisture control, temperature monitoring |
| Seedling |
2-3 weeks |
First true leaves, 4-6 leaf sets |
Light positioning, watering schedule |
| Vegetative |
3-16 weeks |
Rapid height growth, full leaf development |
Training, feeding, pruning |
| Pre-flowering |
1-2 weeks |
Sex determination, stretch phase |
Light cycle adjustment, final training |
| Flowering |
6-8 weeks |
Bud formation, trichome development |
Nutrient changes, harvest preparation |
| Harvest |
1-3 days |
Cloudy trichomes, amber pistils |
Cutting, trimming, initial drying |
Autoflower strains complete this cycle in 8-12 weeks total, while photoperiod strains require 4-6 months. Indoor growers can control timing by adjusting light schedules, but outdoor plants depend on natural daylight changes that occur in late summer and fall.
Temperature, humidity, and genetics significantly affect these timeframes. Sativa-dominant strains typically take longer than indica varieties, and stress from environmental problems can extend any stage by weeks.
Stage 1: Germination (3-10 Days)
Germination transforms a dormant cannabis seed into a living plant with its first root system. This stage determines whether your grow succeeds or fails before you even plant anything, making seed quality and technique the foundation of your entire crop.
How to Identify Viable Seeds
Healthy cannabis seeds show specific visual characteristics that predict successful germination. Look for seeds that are dark brown or black with subtle stripes or spots. The surface should feel hard when pressed gently between your fingers. Avoid seeds that are green, white, or easily cracked under light pressure.
Fresh seeds typically have a waxy coating that creates a slight shine. Seeds stored properly maintain viability for 2-5 years, but older seeds may still germinate with lower success rates.
Germination Methods Compared
- Paper towel method: Place seeds between damp paper towels in a warm, dark location. Check daily for taproot emergence, which typically occurs within 24-72 hours for viable seeds.
- Direct soil planting: Plant seeds 1/4 inch deep in growing medium. This method reduces transplant shock but makes it harder to identify failed seeds early.
- Water glass method: Soak seeds in room temperature water for 12-24 hours before transferring to paper towels. This pre-soaking can speed germination by 1-2 days.
The paper towel method offers the best combination of speed and visibility, allowing you to confirm germination before committing growing space.
Common Germination Problems
Seeds that fail to germinate after 10 days are likely not viable. The most common cause is old or improperly stored seeds that have lost moisture content. Seeds exposed to temperature fluctuations or high humidity during storage often fail to sprout.
Overwatering kills more germinating seeds than underwatering. The growing medium should feel damp but never waterlogged. Seeds need oxygen at the root zone, which standing water prevents.
Temperature problems also prevent successful germination. Cannabis seeds need consistent temperatures between 70-85 degrees F. Temperatures below 65 degrees F significantly slow the process, while temperatures above 90 degrees F can damage the embryo inside the seed.
Stage 2: Seedling Phase (2-3 Weeks)
The seedling stage begins when the taproot establishes and the first rounded cotyledon leaves emerge from the soil. During these critical first weeks, your plant develops its root system and produces its first true cannabis leaves with the characteristic serrated edges.
Week-by-Week Development Markers:
- Days 1-7: Cotyledon leaves open and turn green. Plant height reaches 1-2 inches. Root system establishes in growing medium.
- Days 8-14: First set of true leaves appears with single serrated edges. Plant height increases to 2-4 inches. Root system spreads horizontally.
- Days 15-21: Second and third leaf sets develop with 3-5 serrated edges each. Plant height reaches 4-6 inches for healthy seedlings.
A healthy 3-week-old cannabis plant should have 3-4 sets of true leaves beyond the initial cotyledons. The leaves should be bright green without yellowing tips or brown spots. Stunted growth at this stage often indicates root problems or environmental stress.
Troubleshooting Common Seedling Issues:
- Stretching: Tall, thin stems indicate insufficient light intensity. Move lights closer or increase wattage.
- Yellow cotyledons: Normal after 10-14 days as the plant uses stored seed energy and transitions to photosynthesis.
- Drooping leaves: Usually indicates overwatering. Allow growing medium to dry slightly between waterings.
- Brown leaf tips: Often caused by nutrient burn from feeding too early. Seedlings typically need only water for the first 2 weeks.
Seedlings grow best with 18-24 hours of light daily and temperatures between 70-75 degrees F. Humidity should stay around 65-75% to prevent the small root system from becoming stressed.
Growth Stage Visual Identification Guide
Recognizing healthy development at each growth stage prevents problems before they become serious. Each stage produces distinct visual markers that tell you whether your plant is progressing normally or needs attention.
Visual Characteristics by Stage:
| Stage |
Leaf Pattern |
Plant Height |
Root Development |
Healthy Indicators |
| Seedling |
1-3 serrated edges |
2-6 inches |
Surface roots establishing |
Bright green, upright growth |
| Early Vegetative |
5-7 serrated edges |
6-18 inches |
Root ball formation |
Rapid leaf production |
| Mid Vegetative |
7-9 serrated edges |
1-3 feet |
Deep taproot system |
Thick stems, broad leaves |
| Pre-flowering |
Full leaf development |
2-4 feet rapid stretch |
Established root mass |
Sex organs visible |
| Early Flowering |
Leaf yellowing begins |
Height stabilizes |
Root growth slows |
White pistils or pollen sacs |
| Late Flowering |
Sugar leaves prominent |
No height increase |
Nutrient uptake focused |
Swollen buds, trichome development |
Size Ranges for Healthy Development:
A 6-week-old cannabis plant in vegetative growth should measure 12-24 inches tall with a stem thickness of at least 1/4 inch at the base. Plants significantly smaller than this range may have root problems or insufficient lighting.
Problem Identification by Visual Cues:
Drooping leaves that recover after watering indicate normal water uptake. Leaves that remain droopy after watering often signal root rot or nutrient lockout. Understanding cannabis plant anatomy helps identify whether leaf problems stem from structural issues or environmental stress.
Stage 3: Vegetative Growth (3-16 Weeks)
Vegetative growth transforms your small seedling into a mature plant capable of producing flowers. During this stage, cannabis focuses entirely on building leaf mass, stem strength, and root development. Indoor growers typically maintain 18-24 hours of light daily to keep plants in vegetative growth indefinitely.
Plant height can double or triple during vegetative growth, especially with sativa-dominant genetics. Most growers switch to flowering when plants reach 50-75% of their desired final height, as plants typically stretch another 50-100% during early flowering.
Vegetative Growth Characteristics:
- Leaf production: Rapid leaf production with increasingly complex serrated patterns.
- Stem development: Thick stem development that can support heavy flower clusters.
- Root formation: Extensive root system formation that fills the growing container.
- Training response: Strong response to training techniques like topping and low-stress training.
Nutrient requirements increase significantly during vegetative growth. Plants need high nitrogen levels to support leaf development, along with adequate phosphorus and potassium for root and stem growth. Most growers begin regular feeding schedules 3-4 weeks after germination.
The vegetative stage offers the best opportunity for plant training and pruning. Techniques like topping, where you cut the main growing tip, encourage bushier growth and more potential flower sites. Low-stress training involves gently bending branches to create an even canopy that maximizes light exposure.
Indoor growers control vegetative duration by maintaining long light periods. Outdoor plants enter vegetative growth naturally in spring and continue until late summer when decreasing daylight triggers flowering. This natural cycle typically means 4-6 months of vegetative growth for outdoor plants.
Stage 4: Pre-Flowering Transition (1-2 Weeks)
Pre-flowering begins when you change indoor light schedules to 12 hours on and 12 hours off, or when outdoor plants detect shorter days in late summer. This transition period triggers hormonal changes that prepare the plant for reproduction and flower development.
The most dramatic change during pre-flowering is rapid vertical growth called “stretching.” Plants can grow 2-6 inches per week as they race to position themselves for optimal light exposure during flowering. This stretch typically continues for 10-14 days after the light schedule change.
Pre-Flowering Development Signs:
- Height increase: Rapid height increase with longer internodes between leaf sets.
- Pre-flowers: Appearance of pre-flowers at branch intersections showing plant sex.
- Resource consumption: Increased water and nutrient consumption as growth accelerates.
- Leaf shape changes: Subtle changes in leaf shape as the plant prepares for flower production.
Sex determination becomes visible during pre-flowering, typically 7-10 days after changing to 12/12 lighting. Female plants develop small white pistils that look like tiny hairs, while male plants produce small round pollen sacs. Identifying and removing male plants prevents unwanted pollination that reduces flower quality.
Environmental stability becomes critical during pre-flowering. Stress from temperature fluctuations, watering inconsistencies, or nutrient problems can cause female plants to develop male flowers, creating hermaphrodite plants that self-pollinate and reduce harvest quality.
This stage marks the last opportunity for major plant training. Once flowering begins in earnest, branches become more brittle and training techniques can damage developing flower sites.
Male vs Female Plant Development
Cannabis plants reveal their sex during the pre-flowering transition, typically 7-14 days after switching to 12-hour light cycles indoors or when outdoor plants detect shortening days. Understanding sex identification prevents male plants from pollinating females and reducing your harvest quality.
Female Plant Identification:
Female plants develop small white pistils that emerge from tiny green pods called calyxes at branch intersections. These pistils look like fine white hairs extending from the plant. Female plants are the source of consumable cannabis flowers and produce the highest concentrations of THC and CBD.
Male Plant Identification:
Male plants produce small round or oval pollen sacs that hang from short stems at branch intersections. These sacs start small and green but grow larger and eventually open to release pollen. Male plants typically show sex 1-2 weeks earlier than females.
Hermaphrodite Recognition:
Stress can cause female plants to develop male pollen sacs alongside female pistils. This hermaphrodite condition often results from light leaks during dark periods, temperature extremes, or nutrient stress. Hermaphrodite plants can self-pollinate and should be monitored carefully or removed.
Managing Male Plants:
Most home growers remove male plants immediately after identification unless breeding is the goal. One male plant can pollinate multiple females within a grow room, causing flowers to develop seeds instead of the resinous buds preferred for consumption.
Keep male plants only if you want to collect pollen for breeding projects. Isolate males completely from females to prevent accidental pollination. The guide on why cannabis plants turn purple explains how genetic traits like color are passed from parent plants to offspring through controlled breeding.
Stage 5: Flowering and Bud Development (6-8 Weeks)
Flowering transforms your mature cannabis plant into a resin-producing flower factory. Female plants focus entirely on developing dense, trichome-covered buds that contain the cannabinoids and terpenes you want to harvest. This stage requires the most patience as buds slowly mature over 6-8 weeks.
Early Flowering (Weeks 1-2):
Plants continue stretching while developing initial flower clusters at branch tips and intersections. White pistils become more numerous and begin forming the foundation of future buds. Nutrient needs shift from nitrogen-heavy vegetative formulas to phosphorus and potassium-rich flowering nutrients.
Mid Flowering (Weeks 3-5):
Bud formation accelerates as flower clusters connect and thicken. Trichomes begin appearing as tiny crystal-like structures on flowers and surrounding leaves. Plants develop strong odors as terpene production increases. Water consumption typically peaks during this period.
Late Flowering (Weeks 6-8):
Buds reach maximum density while trichomes mature from clear to cloudy white. Pistils change from white to brown or orange as flowers approach harvest readiness. Some fan leaves naturally yellow as the plant redirects energy into flower development.
Flowering Environmental Requirements:
Temperature should drop slightly during flowering, with daytime temperatures around 65-75 degrees F and nighttime temperatures 5-10 degrees cooler. Humidity needs to decrease to 40-50% to prevent mold development in dense buds. Air circulation becomes critical as flowers create microclimates that can harbor fungal problems.
Light requirements change during flowering as plants use different wavelengths for flower development compared to vegetative growth. Many indoor growers switch to lights with more red spectrum during flowering to maximize bud density and resin production.
Common Growth Stage Problems and Solutions
Each growth stage presents specific challenges that can slow development or reduce final harvest quality. Identifying problems early and applying targeted solutions prevents minor issues from becoming major crop failures.
Seedling Stage Problems:
- Damping off: Fungal infection that kills young plants at soil level. Prevent with sterile growing medium and avoid overwatering.
- Nutrient burn: Brown leaf tips from feeding too early. Use plain water for first 2-3 weeks after germination.
- Stretching: Weak, tall stems from insufficient light. Move lights closer or increase intensity.
Vegetative Stage Problems:
- Nutrient deficiencies: Yellow leaves, slow growth, or unusual coloring indicate feeding problems. Most commonly nitrogen deficiency shown by yellowing from bottom leaves upward.
- Light burn: Bleached or crispy leaf tops from lights too close. Maintain proper distance based on light type and wattage.
- Pest infestations: Spider mites, aphids, and fungus gnats prefer vegetative plants. Regular inspection and early treatment prevent major infestations.
Flowering Stage Problems:
- Bud rot: Gray mold that destroys flowers from inside out. Prevent with lower humidity, better air circulation, and removing infected material immediately.
- Nutrient lockout: Plant cannot absorb nutrients due to pH problems or salt buildup. Flush growing medium and adjust feeding schedule.
- Light leaks: Any light during dark periods can disrupt flowering hormones and cause hermaphrodite development.
Universal Environmental Problems:
Temperature extremes stress plants at any stage. Consistent temperatures between 65-80 degrees F support healthy development. Plant growth regulators can help plants recover from environmental stress, but prevention through climate control works better than treatment.
Stage 6: Harvest Time Recognition
Determining optimal harvest timing requires examining trichomes and pistils rather than relying on seed bank flowering estimates. Harvest timing directly affects potency and effects, making this decision one of the most important in your entire grow cycle.
Trichome Examination:
Trichomes progress from clear to cloudy white to amber as cannabinoids mature. Clear trichomes contain primarily THCA that converts to THC when heated. Cloudy trichomes indicate peak THC production. Amber trichomes show THC degradation into CBN, which produces more sedating effects.
Most growers harvest when 70-80% of trichomes appear cloudy white with 10-20% turning amber. This timing provides maximum THC content while beginning the conversion to CBN that balances effects.
Pistil Color Changes:
Fresh pistils start white but turn brown, orange, or red as flowers mature. Harvest typically occurs when 70-80% of pistils have changed color and begun retracting into the flower structure. However, pistil color alone is less reliable than trichome examination.
Environmental Harvest Indicators:
Plants naturally yellow some fan leaves during late flowering as they redirect nutrients into flower development. This senescence is normal and often accelerates in the final 1-2 weeks before harvest. Sudden yellowing or leaf drop may indicate nutrient problems rather than natural maturation.
Harvest Timing by Desired Effects:
Early harvest (more clear trichomes) produces more energetic, cerebral effects. Late harvest (more amber trichomes) creates heavier, more sedating effects. Most medical users prefer the balanced effects achieved with mixed trichome colors.
Note: The content on this page is for informational purposes only and is not intended to be professional medical advice. Do not attempt to self-diagnose or prescribe treatment based on the information provided. Always consult a physician before making any decision on the treatment of a medical condition.
Note: Veriheal does not support illegally consuming therapeutic substances such as cannabis but acknowledges that it transpires because of the current illicit status, which we strive to change by advocating for research, legal access, and responsible consumption. Always consult a physician before attempting alternative therapies.
Ready to start your own cannabis cultivation journey? Getting your medical cannabis card opens legal growing opportunities in many states. Get started with Veriheal to explore your state’s home cultivation options and connect with qualified physicians who understand cannabis cultivation for medical purposes.
Frequently Asked Questions
How do I know if my plants are overwatered?
Overwatered cannabis plants show drooping leaves that remain limp even when the growing medium feels moist. Healthy plants with proper watering will have leaves that stand upright and feel firm to the touch. Check soil moisture 1-2 inches deep before watering again.
How many hours of light are required for growing cannabis?
Cannabis plants need 18-24 hours of light during vegetative growth and exactly 12 hours during flowering. Seedlings can handle 18-20 hours of light daily without stress. Consistent light schedules are more important than maximum duration.
Can you speed up the germination process of cannabis?
Pre-soaking seeds in room temperature water for 12-24 hours can reduce germination time by 1-2 days. Maintaining consistent temperatures between 75-80 degrees F also speeds the process. However, viable seeds typically germinate within 3-7 days regardless of methods used.
Author, Share & Comments