1-855-452-6224 (Customer Support Available 24/7)
As we enter into the era of anticonsumerism, learning DIY skills – whether it’s growing vegetables, sewing your own clothes, or finally nailing at-home espresso – is all the rage. It’s not only cheaper, but it’s often more sustainable and far more satisfying to use everyday items that you made with your own hands. It doesn’t have to be intimidating, either; there are countless crafts perfect for beginners that you can tackle with just a few accessible ingredients.
Interestingly enough, much of cannabis culture has DIY roots. Cannabis enthusiasts were growing their own weed, straining nugs through cheesecloths to bake magic brownies, and making bongs out of water bottles long before the advent of dispensaries, highly-regulated edibles, and fancy electronic pipes. It’s easy now to rely on smoke shops for your newest cannabis accessory, but there’s no better way to pay tribute to those who came before us than by crafting it yourself.
Today, we’re going to be tackling the art of the DIY ashtray. This simple but functional piece of cannabis equipment is essential when smoking indoors (or anywhere else you don’t want to leave a mess), as it’s useful for both stubbing out joints and emptying spent bowls. Keep it basic with air-dry clay, or show off your skills with a 3D printer or laser wood-cutter – truly, the sky is the limit.
Here are a few of our favorite DIY ashtrays, as well as some handy tips for attempting to make one on your own. Let’s get started!
We’ve all been there – you gathered the homies, rolled up the perfect blunt, and sat down to start the circle only to realize that you have no ashtray on hand. What can you grab quickly to get the job done?
There are countless household items that you can turn to in a pinch for ash, but first, remember that it’s vital to seek out fireproof materials like metal, glass, or stone, as cardboard and thin plastics can melt and catch fire from stray embers. If you must use a plastic or cardboard item, we strongly recommend that you put some sand, dirt, or water in the bottom to suffocate errant flames.
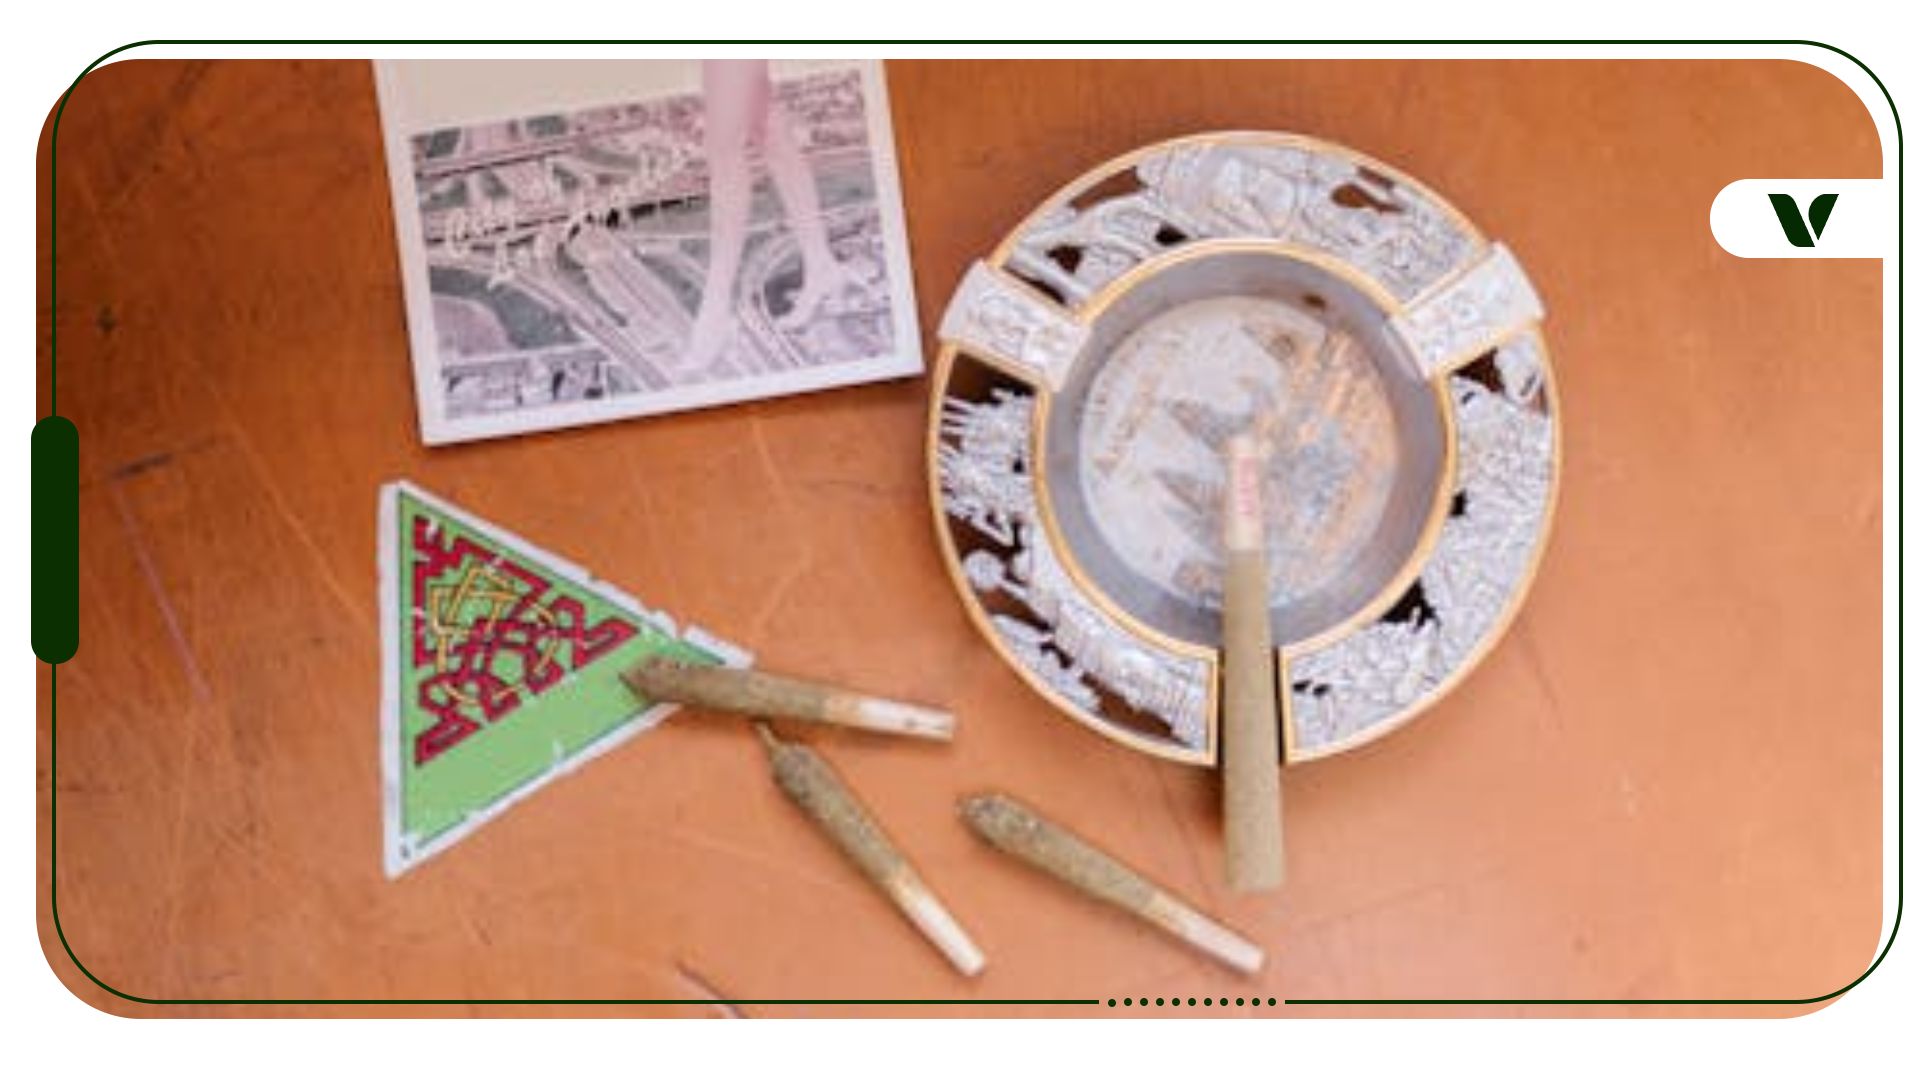
As long as it’s fireproof, though, the world is your oyster. Teacups, seashells, mason jar lids, old toys, mini cast iron skillets, empty candles, mint tins, and shot glasses are just a few options (and they can make great conversation starters, too).
If you’re looking for something simple that still has DIY elements, there are plenty of items you can recycle into ashtrays without spending a dime.
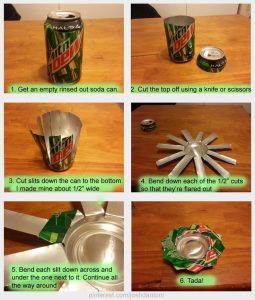
For a cheap solution, look no further than empty bottles, aluminum cans, mason jars, or planter pots. All have been used by dedicated cannabis consumers for decades as safe ashtrays for discarded roaches, and they’re easy to customize.
There are countless unique ways to get creative with these items – for example, you can make aluminum sculptures or paint a small terracotta plant pot for a more personalized feel. As a bonus, these crafts are extra fun after indulging in a creative strain.
If you’re using a plant pot, simply flip it upside down into its matching base for a quick, sealed off ashtray!
READ: What Color Is Your Ash: Signs of Quality Cannabis
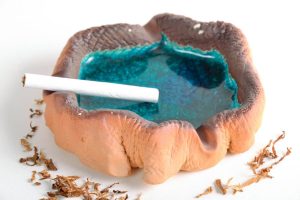
Air-dry or polymer clay is a fun (and cheap) way to make a cannabis ashtray at home since it only takes one ingredient and a little time. It’s a perfect craft to take on solo or with friends, and you can make it as simple or elaborate as you’d like.
Before starting, know that standard craft clays may get damaged or release toxic fumes if they come into direct contact with heat. It’s advised to use a glass, metal, or ceramic base at the bottom of the tray to prevent any issues. Some people even use beads or seashells to make it more aesthetically pleasing while still offering protection from embers.
To use polymer clay, you’ll need your clay, a smooth, non-stick surface, and an oven and baking sheet. You can also gather various tools, like knives or toothpicks, to shape and mold fun designs on the sides. Don’t forget isopropyl alcohol and varnish for a more polished final appearance, although these steps are optional.
Start by kneading your clay until it’s pliable. Once it is ready, mold it into your desired shape. Insert your non-flammable base, making sure it’s flush with the bottom of the tray. Now, you can add any extra features you would like – for example, notches to hold joints or decorative 3D elements. Once the ashtray looks just right, smooth out any rough areas with isopropyl alcohol and bake according to the directions on your clay package.
Air-dry clay largely uses the same process, but you can skip baking it in the oven and let it dry on its own for a couple of days instead. It may be more fragile this way, so check your clay packaging to see if it can be baked in the oven for a more sturdy finish.
After your clay is hardened, you can paint and then varnish it for a final polish.
At the end of the day, a DIY ashtray is more than just a place to dump embers. It’s also a chance to exercise your creativity, recycle what you already have, and make your cannabis rituals feel more personal.
No matter what materials you choose or how elaborate your crafting process is, the best ashtray is the one that feels uniquely yours. Cannabis culture has long thrived on ingenuity, and making your own accessories is a lovely way to honor those traditions while adding a little style (and sustainability) to your smoke sessions.
If you already have a preferred way to make a DIY ashtray, be sure to let us know in the comments. If not, we hope you enjoy one of these methods – happy crafting!
Sign up for our newsletter
Learn the process in your state
All Rights Reserved Veriheal Inc. ©
Terms Privacy Policy Advertising Agreement Content Disclamer


Get your medical marijuana card today
Sign up in under 5 minutes
Start By Selecting Your State
 Alabama
Alaska
Arizona
Arkansas
California
Colorado
Connecticut
Delaware
Florida
Georgia
Hawaii
Idaho
Illinois
Indiana
Iowa
Kansas
Kentucky
Louisiana
Maine
Maryland
Massachusetts
Michigan
Minnesota
Mississippi
Missouri
Montana
Nebraska
Nevada
New Hampshire
New Jersey
New Mexico
New York
North Carolina
North Dakota
Ohio
Oklahoma
Oregon
Pennsylvania
Rhode Island
South Carolina
South Dakota
Tennessee
Texas
Utah
Vermont
Virginia
Washington
West Virginia
Wisconsin
Wyoming
Puerto Rico
Alabama
Alaska
Arizona
Arkansas
California
Colorado
Connecticut
Delaware
Florida
Georgia
Hawaii
Idaho
Illinois
Indiana
Iowa
Kansas
Kentucky
Louisiana
Maine
Maryland
Massachusetts
Michigan
Minnesota
Mississippi
Missouri
Montana
Nebraska
Nevada
New Hampshire
New Jersey
New Mexico
New York
North Carolina
North Dakota
Ohio
Oklahoma
Oregon
Pennsylvania
Rhode Island
South Carolina
South Dakota
Tennessee
Texas
Utah
Vermont
Virginia
Washington
West Virginia
Wisconsin
Wyoming
Puerto Rico